If you decide to work on supports to support peonies, then it’s worth knowing what kind of stand you can make and how to tie it up to make it look beautiful. Despite their advantages, flowers have one serious problem. Peonies are very sensitive to wind and can even suffer under the weight of their own buds. The solution is simple. Creation of additional support and protection. It is not at all necessary to buy a finished product. You can make it yourself.
Why make supports
Nature has endowed peonies with bright, lush buds.Therefore, many flower growers and summer residents are willing to breed these flowers. In addition, the flowering period is long. Allows you to enjoy open peonies from late spring to mid-summer. One problem: the plant stems are too weak to bear the weight of the inflorescences.
Under gusts of wind and rain, they are often bent to the ground. And then all the beauty will disappear... Experienced gardeners have long discovered a way to “fight gravity.” These are props. They are sold in specialized stores. However, many will probably find the strength to make peonies supports with their own hands. Literally on the knee, from scrap materials. Remaining after renovation, found in the storage room.
How to make them
Making supports is not as difficult as it seems. Every gardener can build them. Not necessarily experienced. Several options will be considered below:
- From an old basket.
- Sections of willow twigs.
- Plastic pipes.
- Fittings.
- Pegs with a rope.
- Grids.
Using an old, unnecessary basket is one of the budget options. Now you rarely see them on the farm, but many still use them. One has only to look into the pantry, barn. There is no need to redo anything. It will be enough to cut out the bottom. After this, the basket is ready for use.
Practice shows that most often the handles of this household item become unusable. The top may become frayed. But the walls themselves wear out little. Peonies look quite presentable in a basket.
To secure the support with the ground so that the basket is not blown away by the wind, it is permissible to use pegs. They are driven into the ground, and then the basket is tied with rope and wire. And the support is ready.
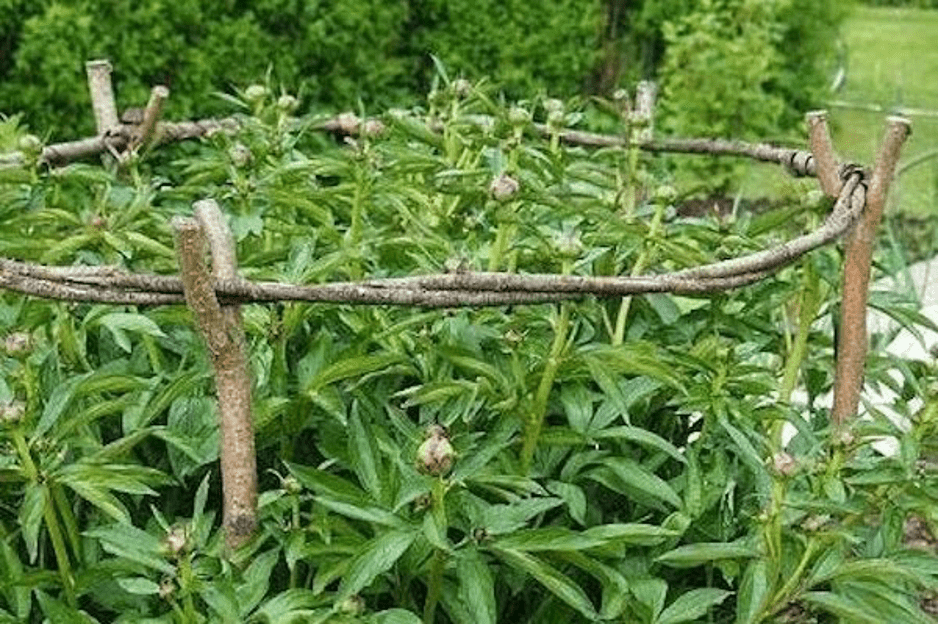
The next method is to use willow twigs. Yes, the same ones from which household utensils used to be woven.It is necessary to select several segments of equal length. It is possible to create arcs from vines by sticking them into the ground and tying them together. As shown in the photo below.
The support is ready, the peonies are reliably protected. An even simpler method is to use a combination of rods + pegs. The latter need to be cut so that you get a spear. The number of “columns” used is from 3 to 6. Depends on the size of the flower bed with peonies.
At the final stage, the pegs are tied together, laying a ring around the perimeter. It can be made of the same rods or wire. For reliability, you can tie the ring to the pegs.
Next, we will consider more modern solutions.
Under peonies made of plastic pipes
The greatest interest among gardeners as a material for supporting peonies is plastic (PVC) plumbing pipe. It is durable, does not rot, and is not subject to destruction under the influence of heat or cold. It is quite possible to build a suitable support for peonies from scraps of plastic. One that will survive more than one season. Will last a long time.
The video can be viewed at the link:
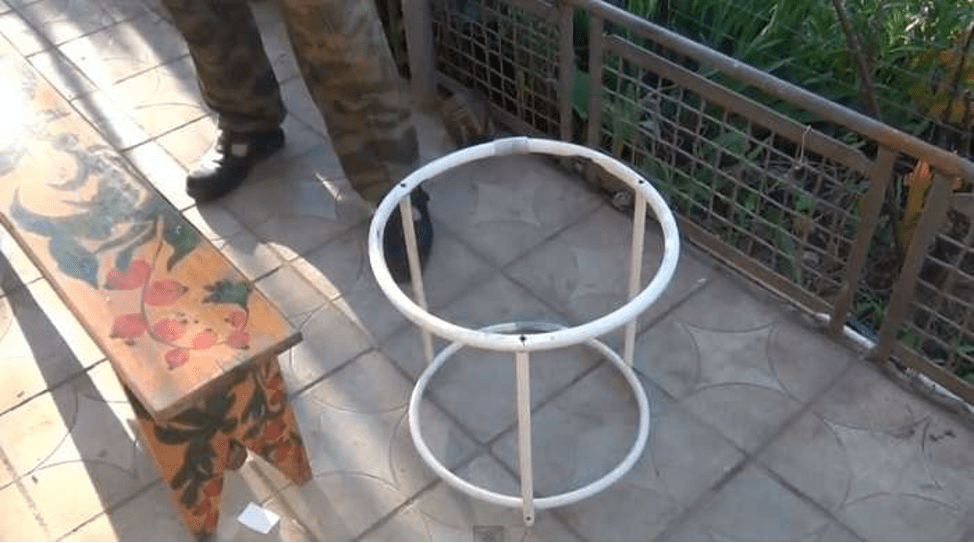
You won't need a lot of pipes. The material is easily bent even by hand, cut and processed. All that is required is to bend the ring and then tie it to the vertical (straight) pieces. The finished support does not rust and does not require maintenance or painting. Places on top of the bush. The manufacturing steps will be described below.
For peonies made of plastic pipes
Making a stand from a polymer (metal-plastic) pipe will not be difficult for the gardener. Especially if there are tips. It is best to take pipes of small diameter. 1/2 inch (16 millimeters), 3/4 inch (20 millimeters). Thicker ones are more difficult to bend at home.
The pipe flow rate is determined simply using the well-known circumference formula. It is 2πR. For those who find this too difficult, they can find an online calculator on the Internet. The finished stand should surround the bush. This determines its diameter. Let's assume that your bush is approximately 1 meter in diameter. We take this size as a basis. This will be the diameter (or double the radius), multiplied by the number “pi”. We get 3 meters 14 centimeters. Since there will be 2 rings, upper and lower, we double the figure.
It remains to determine the number of racks and their height. Add allowance for cutting, determine the need for the pipe. You need at least 3 racks. Let's assume that they are 1 meter long. In total, it turns out that the stand will require about 9.3 meters of PVC pipe, excluding trimming. For smaller supports, the indicators are adjusted. What materials do you need:
- 1/2, 3/4 inch pipe (approximately 9-9.5 meters).
- Barrel (plastic, metal).
- Wood trimmings.
- A piece of hose with a diameter of 20-25 millimeters.
- Several self-tapping screws.
The barrel is needed as a basis for arching the circle. If aesthetics are not critical, you can do without it. At the first stage, we measure and cut the required piece of pipe to create rings. The plastic bends easily by hand; using a mandrel to give it the desired shape is even easier.
The ends of the pipe are connected together with pieces of hose. Its size depends on the diameter of the pipe. The plastic should fit tightly into the hose.
It is permissible to replace the hose with a piece of wood, pushing it tightly into the pipe. We've sorted out the rings. Next, the racks are cut. We decided that there would be 3 of them, each 1 meter long. We measure, cut. Do not forget that the racks must be placed evenly around the circumference.Those who have forgotten the geometry, dividing a circle into 3 parts, can mark the rings “by eye”. It is very important that the markings on the upper and lower parts match. Otherwise, the racks will noticeably “mow”.
When the marking is completed, begin attaching the racks. It is best to do this using screws and self-tapping screws of a suitable size. Using a screwdriver, tighten the posts to the rings. A screwdriver will speed up the process.
The appearance of the future peony support depends on the “dexterity of hands” and the accuracy of movements. It is advisable to bend the circles as carefully as possible. Doing this on a flat, horizontal surface. Hint: a piece of wood (chop) hammered into the end of the post will make the connection more reliable.
That's all. The support is ready. It can be used repeatedly. A more complex, costly option involves the use of transition connections and tees.
This unit is installed in it at the junction of the ring with the stand. No screws needed. But the accuracy of the marking is important.
From reinforcement
Unnecessary reinforcing bars with a diameter of 10-12 millimeters will serve perfectly as support. Thicker rods are more difficult to take shape without special tools. The reinforcement is bent in the form of arcs - squares, semicircles. It all depends on the imagination and creativity of the gardener. The ends of the rods are buried in the ground. Disadvantage - the reinforcement is susceptible to the destructive effects of corrosion. That doesn’t stop us from recommending it for supporting peonies.
In addition to creating and installing supports, gardeners use peony garters. How to do this will be discussed below.
Garter instructions
The process itself is quite simple. All you need is rope (twine) and wooden pegs. Tools that would help include a tape measure and a hammer. This alternative does not require the manufacture of a support.And it also helps preserve peonies. 2 options are used:
- On pegs.
- Using a grid.
The old fashioned way
The first method is the simplest. You could even say budget. Does not require special knowledge or skills. Moreover, the presence of complex equipment, tools, and expensive materials. All you need is a ball of rope and a few wooden pegs.
Size is not critical. It is only important that the top of the pegs is at the level of the transition of the peony stem into the inflorescence. It is permissible to build a support when the peonies have not yet grown. It's not difficult to make. You need to drive pegs around the perimeter of the planting and then wrap it with rope. This should create a “trap” that will support the stems.
The pegs are driven into the ground with a hammer (pressed by hand) and wrapped with rope. The length of the columns is measured with a tape measure (depending on the height of the bush). The pegs are cut with a reserve. Considering that approximately 10 centimeters will be in the ground.
Newer ways
A polymer mesh with a large mesh is an effective way to tie up peonies. There are 2 main options. By wrapping a mesh around a ready-made (non-flowering peony bush) and securing the mesh to newly planted peonies. In the first case, a piece of canvas is cut off (the dimensions depend on the height of the bush and the planting area).

The mesh is rolled up. Secure with staples and wire. Also, the finished “pipe” should be attached to posts driven into the ground. This garter looks aesthetically pleasing. And does not require maintenance.
According to method 2, a cut piece of mesh with three-dimensional cells (10, 15 centimeters) is laid on top of the bush. The “roof” is attached on 4 sides.The peonies will take up space in the cells and will grow evenly. It is only important to periodically raise the grid higher.


