Bee colonies are housed in special houses designed for the convenience of insects and beekeepers. Comfort depends on the design features inside and outside. The internal structure of the bee's home is distinguished by the location of the frames, which are divided into separate types. Let's take a closer look at what frames there are and how to place them correctly in the hive to get more honey.
What is a honeycomb frame?
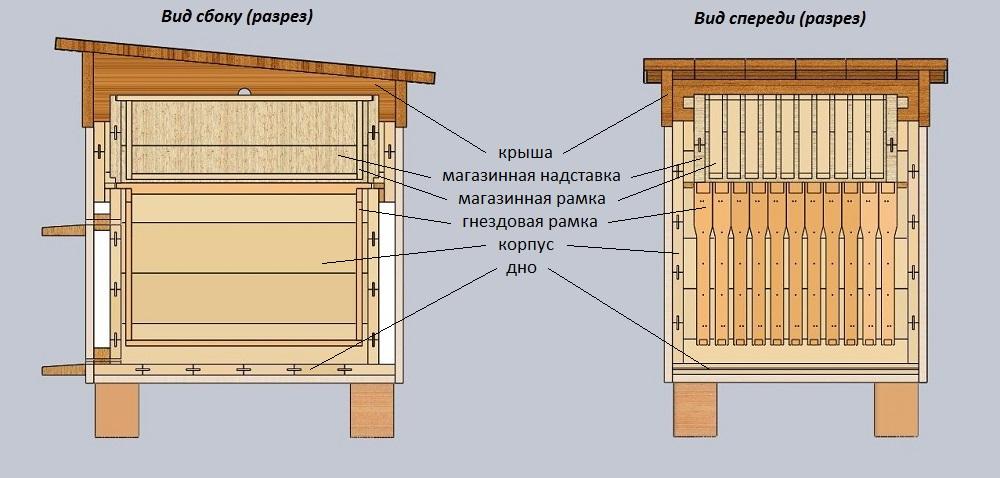
The upper and lower bars, knocked down with thin side strips, with a wire or string stretched inside are called a frame. A layer of wax is attached to the wire - foundation. The frames are attached to the “hangers” on the upper bars by the folds - “shelves” located on the walls of the hive.
Bees use wire to build honeycombs, which they use to store honey or breed. When it's time to harvest, the beekeeper lifts the lid of the hive and easily takes out the filled frame.
During the season of active pollen collection, an extension with a magazine frame is attached to the main body. It differs from the usual one in its smaller size. Several frames are installed in the extension and main building. They are replaced with empty ones as they are filled with honeycombs.
Frames are installed inside the hive to limit and control honey production.
Varieties of bee frames
Wild bees build hives in hollows and branches of trees, under the roofs of buildings and houses. Houses in the apiary are designed with maximum convenience for harvesting, but also the honeycomb bars should not interfere with the living of insects. Frame structures are divided into types depending on their purpose.
Coverts
The slats are located along the edges of the hive. This type is intended for feeding insects and insulating the hive body. Bees can build honeycombs on them and deposit honey. Covering structures also serve to separate nests and divide the hive into zones.
Advantages:
- separate the “living” part from the walls of the housing;
- They keep warm in winter if you add insulation.
Flaws:
- bees can get into the space between the bar and the body.
Feeders
Bees independently obtain food for themselves and their offspring. But at the beginning of the pollen collection season and in winter, insects sometimes require feeding. Feeding frames are designed for additional feeding of insects. The structures can be above-frame, ceiling-mounted or external.
Advantages:
- installed inside and outside the hive;
- support the life of the bee colony.
Flaws:
- not intended for collecting honey.
As a feeder, universal designs with two walls and free space between them are used.
Incubators nurseries
The structures are designed for breeding worker bees and drones. In the compartment with the queen bee, more slats are installed for the offspring and two for honeycombs. Incubators maintain the humidity and warmth necessary to increase the number of bee colonies.
Advantages:
- necessary for bee breeding;
- help the natural addition of the bee colony.
Flaws:
- require additional space in the hive.
Incubators are given more space in the main building if a store one is attached outside.
Zastavnye
Frame structures, which are covered with plywood instead of wire, insulate the hives before the arrival of winter. The fence strips fit snugly against the walls to prevent insects from entering the gap. In the northern regions, the space between the house body and the solid structure is paved with insulating materials.
Advantages:
- help bees survive the winter;
- safe for insects.
Flaws:
- Suitable only for the cold season.
Solid structures cannot be used additionally, for example, for feed.
Construction
The slats are designed for removing drones. There is an opinion among beekeepers that it is not necessary to install them. After all, building structures take labor away from the bee colony.
Advantages:
- maintain the natural composition of individuals;
- can be used to form cells.
Flaws:
- If the string tension is insufficient, the bees do not use them.
Without building structures, insects hatch drones in ordinary honeycomb frames.
Sectional
The special design is intended for the sale of fresh honeycombs. The frame space is divided into sections. As a result, the honeycombs are of the correct shape and are easily divided into identical pieces.
Advantages:
- show the natural origin of honey;
- convenient to use.
Flaws:
- small size.
Sectional planks are called mini-frames because they are 11.5 centimeters long and 7 centimeters wide.
Drawings and dimensions
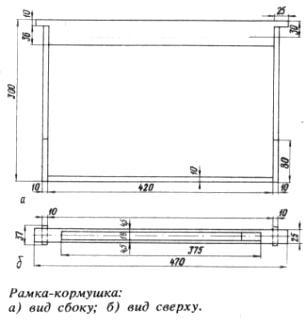
Ready-made frames are more convenient because they will exactly fit the standard size of the hive, and the wire or string will be tightly stretched. When making it at home, there is a risk that the structure will not be strong enough and the bees will not be able to build honeycombs. But with your own hands you can make many frames for non-standard hives from scrap materials.
In a personal household, you can save money on homemade frames. Therefore, before installing the structure, you need to select the size and drawing for the type of hive:
| Hive | Height | Width | Shoulder length | ||
| In centimeters | |||||
| Dadana-Blatta | 30 | 43,5 | 1,5 | ||
| Store | 14,5 | 43,5 | 1,5 | ||
| Langonstropa-Ruta | 23 | 43,5 | 1 | ||
| Ukrainian standard | 30 | 43,5 | 1 | ||
| Ukrainian narrow-tall | 43,5 | 30 | 1 | ||
A standard hive holds 12 frames. The minimum number of frame structures is 8, and the maximum is 24.
Choosing the right material
Bee houses are built close to natural conditions, so natural materials are often used.
Planks and bars
Factory frames are made of plastic and are easier to care for. But for making your own planks, wood is best suited.To make a honeycomb frame, they take soft species of deciduous trees: poplar, willow, linden. Birch and pine quickly become chipped from cutting wires.
Benefits of wood:
- costs less than plastic;
- easy to process;
- subject to quick repair;
- safe for the environment and insects.
Plastic, unlike wood, is resistant to moisture and heat, rodents and bugs. But, according to the observations of beekeepers, bees are reluctant to build honeycombs on plastic frames, and the taste of honey is not for the better. The plastic structure is difficult to make and impossible to repair.
Wire and bushings
To make frames at home, it is better to use stainless steel wire and brass bushings. Stainless steel is resistant to moisture and insect waste products. Regular steel wire is easier to cut, but can spoil the product with a metallic taste. Stainless steel frames will last longer.
The unsuitable material for making strings is wire made of soft metals (aluminum, copper). Over time, they stretch and sag.
For homemade frames, it is better to purchase special wire for beekeeping. It is made of low carbon steel. The diameter of the string is 0.3-0.5 millimeters. Also, an alternative to beekeeping and stainless steel wire is a galvanized steel string. It is strong and flexible and does not tangle.
An expensive but reliable option is tungsten or nichrome wire, which is used in electrical appliances.
Material for fastening honeycomb frames
Wooden blocks are connected using self-tapping screws or knocked down with stainless steel nails. Standard shoe nails are also suitable for assembling the honeycomb frame.To ensure that parts of the frames hold well, they are additionally lubricated with PVA glue marked D-3 or D-4, which is safe for insects.
Manufacturing process
The production of honeycomb frames takes place in four stages: preparation of strips, assembly, tensioning and welding of wire, disinfection. The planks for the planks are pre-dried.
Preparing planks with your own hands:
- the board is removed with a plane to a thickness of 30-40 centimeters and cut into lengths from 14 to 43 centimeters, depending on the type of hive;
- in the bars intended for the top of the frame, cut out “shoulders” 10 millimeters deep, departing 1-1.5 centimeters from each edge;
- Grooves are cut out in the lower bars for connection with the slats, 1 centimeter away from the end.
Before cutting the bars, the centimeters necessary for cutting out the “hangers” and grooves are laid in their length.
How to assemble hive frames:
- alternately connect the upper bar with the side planks, and then the lower one;
- bars and planks are knocked down with nails or screws are screwed in.
The next step is to tighten the strings. To prevent heavy honeycombs from bending the frame, the wire is pulled vertically between thick bars.
How to tension strings with your own hands:
- make holes in the upper and lower bars;
- treat with an antiseptic;
- insert bushings;
- At any extreme hole, drive a nail halfway, wind the wire and hammer it in completely;
- pass the string one by one through the holes in the bars;
- At the last hole, drive the nail in again, wind the end of the wire and hammer it in completely.
Before finally hammering in the second tension nail, the wire is properly tensioned with pliers. A well-tensioned string is springy and sounds like a guitar string. You can use staples instead of nails.
The last stage is attaching the wax wall or waxing. The wooden parts of the frame are disinfected with a 10% alcohol solution of propolis. The wire is heated and immersed in a layer of wax. The procedure can be carried out conveniently and quickly using an electrical device.
How to properly place frames in a hive
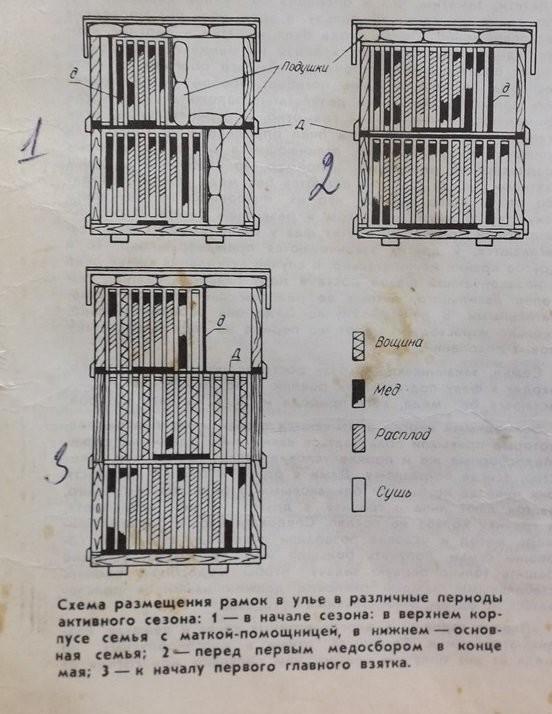
The number and location of honeycomb frames depends on the size of the bee colony and the type of hive. It is also important to place them so that the bees build even combs. Crooked cells are not suitable for storing honey.
Features of frame placement:
- in a square case, the frames are placed lengthwise and crosswise relative to the taphole;
- if it is customary to tilt the hive for inspection, structures for honeycombs are placed longitudinally so as not to damage insects;
- a wax plate attached to the wire will help keep the frame level and the bees will build more honeycombs on either side of it;
- the tension of the wire must be tight, otherwise the honeycombs will not be secured well and fall apart;
- in a standard hive, incubation frames alternate with honeycomb frames so that they do not break off under the weight of insects;
- in multi-hull hives, with a good bribe, you can place several incubation frames in a row;
- if a storehouse with frames for honeycombs is attached to the hive, structures for breeding offspring are placed inside.
In addition to the location of the frames, the position of the hive is important for the construction of honeycombs. The body should be placed slightly inclined towards the tap hole.
It is also important to build well frames in incubators so that the bees build strong honeycombs for hatching workers. They can use unstable cells to raise drones or ignore them altogether. Therefore, the productivity of the bee colony and the amount of honey depend on the quality of the frame.

